Thursday, September 7, 2017

Tomato Curry

Hi friends,
This is a simple recipe to make tomato curry. Requires less time.

Ingredients:
Tomatoes 4
Potato 1
Oil
Mustard seeds
Curry leaves
Garlic
Dhanya powder
Coconut
Jeera
Dry chillies
Sambar powder (optional)
Dal(optional)
Tamarind (optional )

Procedure:
Step 1: Cut tomatoes, peel and cut the potato and put all of these in a steel bowl.
Step 2: Add dal if required to this steel bowl and fill with water. Put a teaspoon of turmeric powder. This bowl needs to be kept in a cooker. After three to four whistles, turn off the cooker.
Step 3. In a mixer, add coconut pieces, dhanya powder, jeera, dry chillies and garlic. If required ,you could add a little of  tamarind. Grind these nicely. Add little water if needed.
Step 4: Take a cooking pan. Add oil, mustard seeds, mashed garlic, curry leaves, add the cooked tomatoes and masala paste which was prepared in the mixer. Let it boil.
Step 5:  Add salt for taste and little water if required. Let it boil for 10 minutes.
That's it! Enjoy this freshly prepared tomato curry with rice...

Tips:
Beans and potato could be sliced into tiny pieces and added to the steel bowl while adding tomatoes during step 1.
Sambar powder could be added in the last step after the vegetables are cooked properly. Let this stay for 5 minutes then turn off the stove.


Wednesday, September 6, 2017

How to get fairer underarms


Hi readers,

This post is regarding the ways to get fairer underarms. Dark underarms will usually make one feel bad. It is a must to keep it fair and neat. Follow below solutions to get fair underarms.

Solution 1:
Mix rice flour, baking soda, honey, milk and water. Apply on the areas that need this treatment. Wait for it to dry. Repeat again the next day. Stick to this routine for about 3 weeks. You will surely see a difference.

Solution 2:
There is a product called Qraa whitening for underarms. This product does a good job and makes sure that your underarms are brightened without any harsh chemicals. It works sooner than natural way and saves a lot of time. Just wash the area and apply this cream. No need to wash it. Repeat daily till you see expected results.

Apart from these solutions, you need to scrub the dark areas ,apply a cleanser and remove dirt using cotton swab. Then follow either of the above solutions.

Remember, it is possible to keep your underarms fair. Those areas are dark only because of sweat, dirt and also due to sun so apply sunscreen too. Maintain for a month to actually see and believe it.

Please let me know your results!


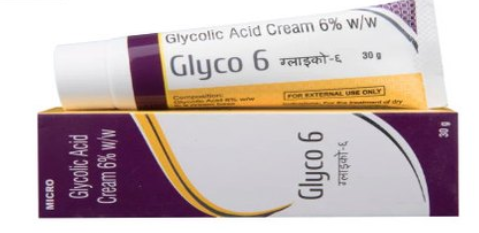
Glyco 6 Cream Review


Hi friends,

Today I am going to give review of an ointment called Glyco 6. This is a treatment for acne. Glyco 6 is nothing but glycolic acid 6%. I started applying because I have been noticing new pimples breaking out recently without any reason. I guess it's because of stress. I will be posting another update regarding this treatment soon.

Procedure:
Wash your face. Let it dry for about 10 to 20 minutes. Apply this cream on your face. If you feel any stinging sensation, it is normal so nothing to worry. Make sure to apply this only at night. Apply sunscreen whenever moving outside of home.

Results:
I applied it. I did not feel any stinging or heating sensation. I feel my skin was smooth. It's fragrance is very mild and nice. Pimples were kinda reducing in size.
I wore sunscreen without fail. I drank lot of water. My pores were also getting into good shape. This treatment maintains my skin. People try glycolic peels that have more  than 50% of glycolic acid in them. They get good results sooner. This glyco cream is 6% but still it does a good job .It clears spots, scars and changes skin texture to give an even tone to it. It is milder than Retin A treatment. This is a good alternative to Retin A treatment.

Rating: 5/5

I am only suggesting this treatment based on my experience. Consult doctor before trying out any treatments like this because results vary from person to person. This treatment could be tried even during pregnancy because it's concentration level is less than 10% . Well, you could still consider doctor's advice if you are planning to use this treatment during your pregnancy time.

Try it and let me know your results!!!

Monday, September 4, 2017

Rasam

Time: 20 minutes to prepare rasam
Servings: 4

Things needed:
Onions- 1
Garlic -10 small pieces
Tomatoes- 2
Dry red chillies-2
Salt-As needed
Oil
Tamarind
Rasam powder
Mustard seeds
Curry Leaves
Sambar powder-1 tsp
Coriander leaves
Pepper powder

Step 1: Take a cooking pan. Add mustard seeds, curry leaves, onions, tomatoes, garlic pieces(no need to mash them) and red chillies into it.
Step 2: Let pan to cook for 5 minutes. Once tomatoes start to become soft, add required quantity of water.
Step 3: Add salt. In a separate small bowl, add tamarind and water. Sqeeze to make some tamarind juice. Ad this juice to the previously made dish.
Step4: Wait until water start boiling. Now add little more salt if needed. Take a teaspoon of rasam powder and add to this bowl.

That's it ! Enjoy with rice...

Monday, August 28, 2017

Sandalwood face pack


Hi readers,
This a quick review of a face pack that has sandalwood in it. I bought this one from a place called Chennapatna which is on the way to Mysore. This is a pack that they specially prepare using natural ingredients. It has a very good mild fragrance of sandalwood.
Ingredients:
Sandalwood
Coconut oil
Procedure:
Apply this pack on cleaned face.
Wait for it to dry.
Wet your face with Lukewarm water, scrub softly to remove the debris along with the pack ingredients and then wipe with a towel.
Follow with a moisturizer.
Benefits:
This pack has ingredients that will surely get you a golden facial glow.
It keeps pimples at bay.
Pack has smooth consistency. So it would be easy to apply without the need to add water in it.
Try and let me know your results!!


Tuesday, August 22, 2017

Dal Curry


Time: 15 minutes to prepare dal curry
Servings: 5

Things needed:

Onions- 1
Garlic -7 pieces
Tomatoes- 2
Dal- half a cup
Green chillies-3 
Salt-As needed
Oil
Mustard seeds
Curry Leaves
Sambar powder-1 tsp

Step 1: Take a steel bowl. Add sliced onions, tomatoes, washed dal grains, garlic pieces(no need to mash them) and chillies into it.

Step 2: Keep this steel bowl in a cooker. If your cooker is a small one then no need to use a separate steel bowl to cook, you could put the ingredients into the cooker directly. If you want to cook rice also side by side in the same cooker only then a steel bowl is required to segregate the rice and dal curry bowls.
Step3: After four whistles turn off the cooker.
Step4: In a cooking pan put some oil, mustard seeds, curry leaves, little mashed garlic and the contents of the steel bowl that was kept in the cooker.
Step5: Add plain water to this bowl to make it less thick but make sure its not watery.
Step6: Once it starts boiling , add sambar powder and salt.
Step7: Let it boil for some more time and then turn off the flame.

That's it! Enjoy your dal curry with rice!


Friday, February 24, 2017

Review of Olivia Herb Bleach

Hi friends,

This post is about a review of Olivia Herb Bleach.


I am not a person who is interested in using creams that have bleaching agents in them but this is one of the bleaching creams that I am really fond of. It is herbal so I did not mind giving it a try!

It claims- 'The first gentle bleach for sensitive skin. This Haldi, Chandan, Aloe Vera, & Nimbu makes your skin fairer & beautiful day by day. The ultimate herbal solution to the unwanted hair growth on your skin. Fades unwanted hair on face, arms and body.'

As it claims it does have haldi, chandan, aloe vera and nimbu and its benefits. The cream is yellow in color and has a pleasant smell. This  pack has a spatula, activator, bleaching cream and an almond moisturizing cream.


Price: 270 Rs

Instructions:
Wash the area of the skin that needs to be made fairer. 


Mix both cream and activator in one plastic bowl. Make sure to use low amount of activator.
Apply this cream using a spatula.
Wait for 15 minutes for it to dry.
Rinse the cream and then apply the moisturizer.

My experience:
When I applied this cream, I did feel a tingling sensation which normally occurs with every bleaching cream. This sensation was very mild. I had kept cucumber slices on my eyes to cool my eyes during this 15 minutes of period of wait. I washed the cream thoroughly from the skin to reveal a lighter skin tone. It was a shade lighter and that made me happy. Sunscreen is a must to retain the lighter tone for long time. This pack could be used once in 15 days.I had no fears while using this pack regularly because it had natural stuff in it. It took care of the unwanted hairs too which is a plus point. Gradually there was reduction in the growth of facial hair on upper lips. I did not have the problem of facial hairs but there were occurrence of small amount of hairs above lips and this took care of it. This lightens your acne marks if there are any.

Would I recommend: Yes definitely!