Monday, September 4, 2017

Rasam

Time: 20 minutes to prepare rasam
Servings: 4

Things needed:
Onions- 1
Garlic -10 small pieces
Tomatoes- 2
Dry red chillies-2
Salt-As needed
Oil
Tamarind
Rasam powder
Mustard seeds
Curry Leaves
Sambar powder-1 tsp
Coriander leaves
Pepper powder

Step 1: Take a cooking pan. Add mustard seeds, curry leaves, onions, tomatoes, garlic pieces(no need to mash them) and red chillies into it.
Step 2: Let pan to cook for 5 minutes. Once tomatoes start to become soft, add required quantity of water.
Step 3: Add salt. In a separate small bowl, add tamarind and water. Sqeeze to make some tamarind juice. Ad this juice to the previously made dish.
Step4: Wait until water start boiling. Now add little more salt if needed. Take a teaspoon of rasam powder and add to this bowl.

That's it ! Enjoy with rice...

Monday, August 28, 2017

Sandalwood face pack


Hi readers,
This a quick review of a face pack that has sandalwood in it. I bought this one from a place called Chennapatna which is on the way to Mysore. This is a pack that they specially prepare using natural ingredients. It has a very good mild fragrance of sandalwood.
Ingredients:
Sandalwood
Coconut oil
Procedure:
Apply this pack on cleaned face.
Wait for it to dry.
Wet your face with Lukewarm water, scrub softly to remove the debris along with the pack ingredients and then wipe with a towel.
Follow with a moisturizer.
Benefits:
This pack has ingredients that will surely get you a golden facial glow.
It keeps pimples at bay.
Pack has smooth consistency. So it would be easy to apply without the need to add water in it.
Try and let me know your results!!


Tuesday, August 22, 2017

Dal Curry


Time: 15 minutes to prepare dal curry
Servings: 5

Things needed:

Onions- 1
Garlic -7 pieces
Tomatoes- 2
Dal- half a cup
Green chillies-3 
Salt-As needed
Oil
Mustard seeds
Curry Leaves
Sambar powder-1 tsp

Step 1: Take a steel bowl. Add sliced onions, tomatoes, washed dal grains, garlic pieces(no need to mash them) and chillies into it.

Step 2: Keep this steel bowl in a cooker. If your cooker is a small one then no need to use a separate steel bowl to cook, you could put the ingredients into the cooker directly. If you want to cook rice also side by side in the same cooker only then a steel bowl is required to segregate the rice and dal curry bowls.
Step3: After four whistles turn off the cooker.
Step4: In a cooking pan put some oil, mustard seeds, curry leaves, little mashed garlic and the contents of the steel bowl that was kept in the cooker.
Step5: Add plain water to this bowl to make it less thick but make sure its not watery.
Step6: Once it starts boiling , add sambar powder and salt.
Step7: Let it boil for some more time and then turn off the flame.

That's it! Enjoy your dal curry with rice!


Friday, February 24, 2017

Review of Olivia Herb Bleach

Hi friends,

This post is about a review of Olivia Herb Bleach.


I am not a person who is interested in using creams that have bleaching agents in them but this is one of the bleaching creams that I am really fond of. It is herbal so I did not mind giving it a try!

It claims- 'The first gentle bleach for sensitive skin. This Haldi, Chandan, Aloe Vera, & Nimbu makes your skin fairer & beautiful day by day. The ultimate herbal solution to the unwanted hair growth on your skin. Fades unwanted hair on face, arms and body.'

As it claims it does have haldi, chandan, aloe vera and nimbu and its benefits. The cream is yellow in color and has a pleasant smell. This  pack has a spatula, activator, bleaching cream and an almond moisturizing cream.


Price: 270 Rs

Instructions:
Wash the area of the skin that needs to be made fairer. 


Mix both cream and activator in one plastic bowl. Make sure to use low amount of activator.
Apply this cream using a spatula.
Wait for 15 minutes for it to dry.
Rinse the cream and then apply the moisturizer.

My experience:
When I applied this cream, I did feel a tingling sensation which normally occurs with every bleaching cream. This sensation was very mild. I had kept cucumber slices on my eyes to cool my eyes during this 15 minutes of period of wait. I washed the cream thoroughly from the skin to reveal a lighter skin tone. It was a shade lighter and that made me happy. Sunscreen is a must to retain the lighter tone for long time. This pack could be used once in 15 days.I had no fears while using this pack regularly because it had natural stuff in it. It took care of the unwanted hairs too which is a plus point. Gradually there was reduction in the growth of facial hair on upper lips. I did not have the problem of facial hairs but there were occurrence of small amount of hairs above lips and this took care of it. This lightens your acne marks if there are any.

Would I recommend: Yes definitely!


Saturday, December 10, 2016

Review of Aztec Indian Healing Clay

Hi my site readers,

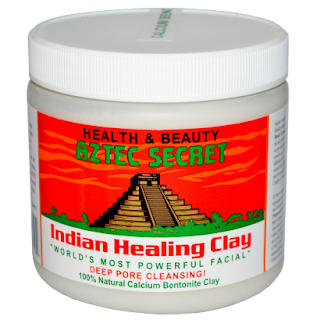
Today I am going to talk about Aztec Indian Healing Clay - World's Most Powerful Mask. This clay mask had so many good reviews over net. I was very curious to know  whether this mask is really that good or not. Read on to know my views on this powerful clay mask.

Aztec Indian Healing Clay

Ingredients:
Calcium Betonite Clay

Price: 1259 Rs

Procedure:
1)Take about 2 teaspoons of the clay mask powder, add a teaspoon of Apple Cider Vinegar or just plain water (many and myself prefer Apple Cider Vinegar).
2)When water is added , it takes some time and effort to get a nice smooth paste but ACV gels well with clay powder to give a really nice smooth paste. This is more effective. It does give a 'oozing' kind of a sound. Do not be alarmed. The pack is just getting charged.
3)Wait for about 5 minutes, if you have a sensitive skin or upto 20 minutes. You will feel a pulling sensation. They have termed it as 'Pulsating effect'. It really feels good.
4)Wash off with warm water.


Benefits:
The Aztec Indian Healing Mask pulls the dirt and debris to provide a glow to the face. The pulsating effect does make you feel it's working. After washing face with warm water, your facial skin will look reddish for a while. The instructions given on the package say that the area will look reddish for about 15 minutes. For me it lasted for just 5 minutes. My skin is sensitive but still my face wasnt reddish for long. The ACV actually helps the clay pack to give this pulsating effect. Water also does a nice job but ACV is highly recommended. If you do not want to use ACV on your face then use water.

How does the pack work ??
The dirt , debris and any other nasty stuff on face are actually positively charged and this clay mask when mixed with water or ACV , KT gets negatively charged. As per physics, unlike charges attract each other. So the dirt will be pulled by the clay mask' negative charges. The pack pulls the dirt to such an extend that the zits which are still below the skin's surface or which are still waiting to come out to the surface will actually be visible. It comes out sooner. You could extract the same using blackhead tool. The ACV would kill the bacteria causing acne. The pack doesn't have this property so combined effect of the pack and ACV will really do wonders to your skin. This pack brightens up your skin. Clears acne scars. Corrects pigmentation problems because of improved blood circulation.

Would I recommend: Yes! Definitely!


Saturday, September 10, 2016

How To Get The Marriage Certificate


Marriage is the sacred union of two souls. After getting married, you would plan to get a marriage certificate. Planning to get your marriage certificate done? Read on to know how you could acquire it.
1: Visit the Sub registrar office of your area.
2: Collect the marriage certificate application (2 copies).
Form details:
·         Details of the Bride
·         Details of Bride Groom
·         Proof of 3 members
3: Documents to be submitted:
·         2B Size joint photograph (5 Nos.)
·         Wedding card
·         Copies of Id Proof and address proof of both Bride and Bridegroom (any of these-Passport/Adhar card/DL/ Voter ID)
·         Marriage certificate application(you could get this at the Sub registrar office itself)
4: Hand over all the documents to the concerned personnel.
5: A computer operator will feed all the details and give a sample copy to check if there are any corrections to be done. If everything goes well, then you will get your marriage certificate done within half a day.

6: Actual Govt. Fees for the marriage certificate is 130 INR.

That's it! Time to Celebrate!

Friday, August 19, 2016

How To Make Homemade Chemical Peels

Homemade Chemical Peels And Its Benefits


AHA(Alpha-Hydroxy Acids) and BHA(Beta-Hydroxy Acids) are chemical exfoliants which removes upper layers of the skin. It improves the texture of the skin. Scarred skin can be improved. Skin could be brightened and rejuvenated. It exfoliates dead skin cells. Smoothens sun damaged and acne prone skin. Dermatologists do these peeling treaments to reveal a smoother and clearer skin for you but at a high cost. You could do this(a milder version of chemical peel) at home at a lesser price!

AHA Chemical Peel

Ingredients needed:
Curd/Yoghurt and cane sugar(primary sources of glycolic and lactic acids)

Procedure:

  1. You could pour yoghurt and cane sugar into a bowl.
  2. Stir properly to get a granulated paste.
  3. Use your fingertips to apply over your face avoiding your eyes. Wait for 15 minutes and wipe it off with water.
BHA Chemical Peel

Ingredients needed:
Baking Soda, Aspirin(source of salicylic acid), Lemon juice, Water

Procedure:

  1. Mix baking soda with water. Stir nicely till it dissolves. Keep it aside. This would act as a nuetralizer. 
  2. Crush few aspirin(uncoated) tablets and pour lemon juice over it. Lemon juice acts as a good exfoliant and also dissolves the aspirin.
  3. Apply over face and let it dry for about 10 minutes.
  4. With a cotton ball wipe it off by dipping cotton ball in baking soda water mixture. Best suited for oily skin types!


That's it! You will surely love it! You have gifted yourself a chemical peel at home that gives you a soft smoother skin. Repeat twice a week for best results.