Wednesday, June 29, 2016

Review of MSM Cream


Hi readers,

Today I am going to review a special miracle cream called MSM cream. Why do I call it as a 'Miracle' cream? Read on you will get to know why.

Acne problem is a skin problem everyone go through atleast once in their lives. Some have very bad experiences with it, some who are lucky do not have much issues with it. When a pimple gets dry and leaves, it does not leave without leaving a mark unless a precaution is taken to make sure no marks are left behind. Some marks also knows as scars are so very noticeable which makes one feel low, guilty and lose confidence. In such times, thoughts that strike their minds are- 'I wish I had not popped the pimple that day! I should have left it as it is!'. Even if you did not pop the pimples while you were awake, you might pop them while you were asleep. How long can you instruct your brain not to pop pimples?  how can you instruct your brain not to pop during sleep? Next morning you will find a reddish spot in the place of a zit because the zit would have given a itching sensation and you would have unknowingly scratched and popped it. Scars that are flat will get healed and would not have any new texture when new skin grows but some scars called as 'pitted' as well as 'rolling' scars give a new texture to the wounded area. When light falls on it, anyone can notice it.
You feel like hiding your face with a scarf. The scar forms for a reason. The skin wanted something that could help it prevent from forming a new texture. It needed a cream that prevents the scar look different from regular skin. 
MSM cream is a cream that helps to smoothen the scars. Be it indented, pitted or rolling scars. It is an organic source of sulfur. Restores & repairs skin & collagen tissue.
Grapefruit seed extract helps to limit bacterial infection. This cream has this too!

Ingredients list:
Please find below the list of ingredients it contains.


Procedure:
Apply it on the infected area once in the morning and then at night before going to bed.

Benefits:
Active pimples gradually get dried and leaves without giving scars.
Pitted as well as rolling scars start to have even texture which makes it look less noticeable.

My experience:
The moment I got this cream, I just hoped that I get an experience that I was waiting all my years of life-'a clear unclogged pores and even textured skin', in short 'a flawless facial skin'! I washed my face properly, applied this cream. There was no irritation or tingling sensation. I was actually surprised because i feel every acne treatment cream would give some kind of sensation atleast, but this did not! It calmed my skin. I noticed a dryness on set on my face but I did not apply moisturizer. I let it stay overnight.

Next day, I washed my face with a mild soap. Wow! It had a wow effect on my face right from first usage. It brightened my skin and made it look like a less oily, actually dry, neat finish skin. I applied this cream again. I usually apply powder while being in office so I applied compact powder later on. I waited to see when I would see oil getting produced on my skin. Did not notice any till noon. Skin looked fresh and bright for long. 

At night, once again I applied this cream. I continued this routine because I noticed good improvements with skin. The pores looker smaller, skin tone was getting lighter and minor scars were fading. I started to fall in love with this cream! I was happy to try this cream. I am not going to stop using this cream. Finally found something that worked with skin infections at a fast rate. It clears active pimples without letting it raise scars after getting dried. It lightens tone so blemishes disappear with leaving marks. It takes care of pigmentation issues brilliantly. The pores' size gets minimized to an extent to get a flawless look for sure. I do not know how this actually works but with the ingredients it has I feel it does its work in a neat and a safe way! Try it guys!


Monday, May 23, 2016

Tomato Gojju

Tomato Gojju


Time: 15 minutes
Servings: For 4


Things needed:

Oil
Mustard seeds
Curry leaves
Urad dal
Channa Dal
Onion
3 tomatoes
Coriander powder
turmeric powder
Chilly powder
ginger garic paste
Salt

Pre-requisites:

Tomatoes must be thoroughly washed and cut into small pieces. If ground version is required then put these cut tomatoes into a mixer grinder.

Steps:
1)Heat oil. Add mustard seeds to it. 
2)When mustard seeds start to flutter , add curry leaves, channa dal and urad dal.
3)Add the nicely slit green chilies and onions then gradually tomatoes after onions become little brownish.
4)Stir the mixture and add ginger garlic paste. 
5)Close the lid for few minutes.
6)Add salt, turmeric, dhanya, and chilly powders.
7)Check the tomato gojju's consistency. Make sure its thick. Turn off stove. Transfer to a blender and grind till it becomes smooth.

Now the dish is ready. Serve as a side dish for chapatis or dosas!


Monday, May 2, 2016

Onions to clear Acne

Hi everyone,

I had been suggesting Acnestar soap (read its review here) to clear acne. Some people who have mild acne want to clear zits in a natural way. Acnestar soap is very safe to be used but still if you want to go for a natural method to clear up your stubborn acne then here is a solution!

ONIONS!


Things needed:
Onion(1)
Oil(Olive, coconut or Bio oil)

Procedure:
1)Cut an onion into two halves.
2)Pour few drops of oil of your choice. I prefer olive oil.
3)Rub softly all over your face avoiding areas near eyes.
4)Wait for 20 minutes and then rinse your facial skin with cold water.
5)Repeat everyday till your face clears up. It could take few weeks.
6)Drink lot of water.

Best to do this procedure 20 minutes before taking bath.

Once you try it, let me know about your views on it!

Take care!


Tuesday, April 12, 2016

Tomato Pajji

Time: 5 minutes 
Servings: For 4

Things needed:

Tomato(1 or 2)
Curd
Garlic 
Green chillies(2 if using 2 tomatoes else one is enough)
Salt Sugar(optional)

Steps: 1)Slice a tomato into medium sized pieces and put them into the mixer. 2)Pour curd as required. 3)Add little garlic, green chillies and salt to taste. 4)Grind the mixture. 5)You could add little of sugar to make the dish taste better.


That's it!


Enjoy your just prepared dish along with rice! :)

Friday, February 5, 2016

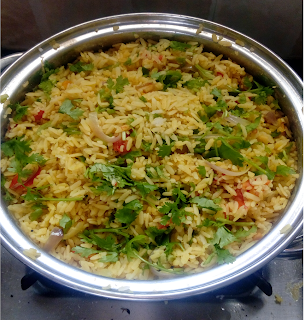
Avalakki Uppit

Avalakki Uppit, Easy Indian Recipe

Time: 15 minutes
Servings: For 4

Things needed:

Avalakki
Mustard seeds
Urad Dal (Uddina bele)
Bengal Gram (Kadle bele)
Curry Leaves
2 onions
4 chillies
2 Tomatoes
Turmeric
Salt

Prequisites:
Want to try a easy breakfast recipe? Read on..!
Its always best to have ingredients ready before we actually start cooking. Wash the onions, green chillies, curry leaves , coriander and lemon.
1)Slice onion into long thin strands.
2)Cut the green chillies. Make sure not to slice these into very small pieces because you may end up eating them. Chillies are meant to give a spicy taste to the dish not to your tongue.
3)Coriander also need to be sliced.1 strand is more than enough. 1 strand will have many small strands in it.
4)You need to transfer Avalakki to a bowl and pour water into it. Drain excess water. Keep it aside for it to absorb the water.

Steps:
1)Pour a tsp of cooking oil to the vessel , turn on the stove. There is one thing that is very common in most of our Indian recipes, use of oil and mustard seeds.
2)After few seconds put half tsp of mustard seeds. You will observe that the seeds slowly get fried.
3)Add urad dal, bengal gram and curry leaves. After few seconds add onion pieces as well as green chillies. Wait till the sliced onion pieces get a little brownish color.

4)Now add tomatoes. Its better to slice the tomato into small pieces and then add them into the pan .
5)Add turmeric powder(half teaspoon) to give a yellowish color to the dish and also to kill any germs that would be in the vegetables, if any.
6)Add the required amount of salt. 
7)The Avalakki would be a litte wet and soft by now. So finally pour in this to the pan. Close the lid for it to be cooked completely for a while. Say, 5 to 10 minutes.

Thats it!
Enjoy your dish! :)

Tuesday, October 13, 2015

Excel shortcuts!

I will let you guys know some tips to save time while using excel spreadsheet.

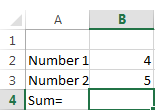
1)Use ALT and = to give sum of the rows.
You need to keep the cursor in the highlighted cell as shown below.

Press ALT and =. The system shows up the formula '=Sum(B2:B3)'. That is the formula for calculating the sum so press 'Enter' to get the answer.


2)Use CTRL and Spacebar to get any particular column selected.
You need to keep the cursor in the highlighted cell as shown below.

Press CTRL and Spacebar to get the entire column selected.

3)Use Shift and Spacebar to get any particular row selected.
You need to keep the cursor in the highlighted cell as shown below.

Now press CTRL and Spacebar to get the entire row selected.

4)Use CTRL and ;(semicolon) to insert Date in the cell.
You need to keep the cursor in the highlighted cell as shown below.
Press CTRL and ; and then you will see the date inserted in the cell.

5)Use CTRL, Shift and ; to insert time in the cell.
You need to keep the cursor in the highlighted cell as shown below.
Press CTRL, Shift and ;.

6)Use CTRL and 0 to hide the data.
You need to keep the cursor in the highlighted cell to be hidden as shown below.
Press CTRL and 0 to hide the column.
The 'Time' column has been hidden. To unhide the same, double click on highlighted space below.

7)Use ALT 'E' and 'D' to delete the data.
You need to keep the cursor in the highlighted cell to be deleted as shown below.

Press ALT 'E' and 'D'. A dialog box appears requiring your input.


8)To navigate quickly over a big spreadsheet, use CTRL and 'Home' to navigate to the start of the spreadsheet or CTRL and 'END' to the end of the sheet.

Related Posts Plugin for WordPress, Blogger...

Monday, October 12, 2015

How to Move Posts Into Pages On Blogspot

Issue: Moving posts into pages on blogspot

Solution:Blogger doesn't have the option of changing a post to a page. Nevertheless you could do it on your own!
Step 1)Go to Blogger.com. Sign into your account.
Step 2)Click on 'Edit Posts'.
Step 3)Go to the post that you would want to be seen in any page.
Step 4)Click 'Edit Html'.
Step 5)Press 'Ctrl+A' to select the content and then 'Ctrl+C' to copy the same to a notepad.
Step 6)Click on 'Close'. A pop-up would warn you of leaving without any changes being saved. Click 'Ok' .
Step 7)Now click on 'New Page'.
Step 8)Click 'HTML' and paste the content copied to notepad.
Step 9)Enter a title for the page.
Step 10)Click 'Publish'.
Step 11)Now Click 'delete' to delete the original post or to have a copy of the post , click 'Edit' and then 'Revert to Draft' to make sure that the post doesn't appear in the main page..

That's it!


Related Posts Plugin for WordPress, Blogger...